Water on the floor is one of those problems that turns an ordinary day into instant chaos. One minute, everything feels normal; the next, you are grabbing towels and trying to figure out where the leak is coming from. The good news is that you do not need to be a professional plumber to slow the problem down. With a calm approach, a few simple tools, and some basic know-how, you can control many minor leaks before they become a disaster. The right gear for stabilizing sewer breaks can buy you enough time to protect your home and schedule a proper repair.
This guide walks you through the basics so you understand what is happening, how clamps and couplings help, and what you can realistically handle on your own. The aim is not to turn you into a full-time pipe expert. Instead, you will gain enough confidence to take smart first steps, protect your home, and avoid the most expensive damage.
It is also worth remembering that professionals face the same situations daily. They use many of the same tools you can store in a simple emergency kit; they are just faster through practice and training. Every day, homeowners often learn a lot by reading real experiences from other people who have called for urgent help and checked reviews of SanDiego Emergency Plumbing & Leak Detection, Chula Vista, CA, which can be a useful reminder that quick action matters.
Why small leaks turn into big problems
A small drip rarely feels dangerous at first. It might just leave a little puddle under the sink or a faint stain on the ceiling. The problem is that water never stays where you want it. It runs along framing, seeps behind walls, and soaks into insulation and flooring. Once that happens, you are not just dealing with a leak. You are looking at swelling wood, peeling paint, strange smells, and possible structural trouble if enough time passes.
Another hidden issue is pressure inside the plumbing system. A tiny pinhole or crack is often the first sign that a pipe is stressed. When water keeps moving through that weak point, the opening can widen. The result can be a sudden burst that sends water spraying far beyond the original area. What felt manageable in the morning can turn into a major flood by evening.
Quick action keeps you ahead of that curve. When you shut off the water fast and apply a simple clamp or coupling in the right way, you reduce stress on the damaged spot. That slows the spread of water, limits the area you need to dry, and makes the final professional repair much more straightforward.
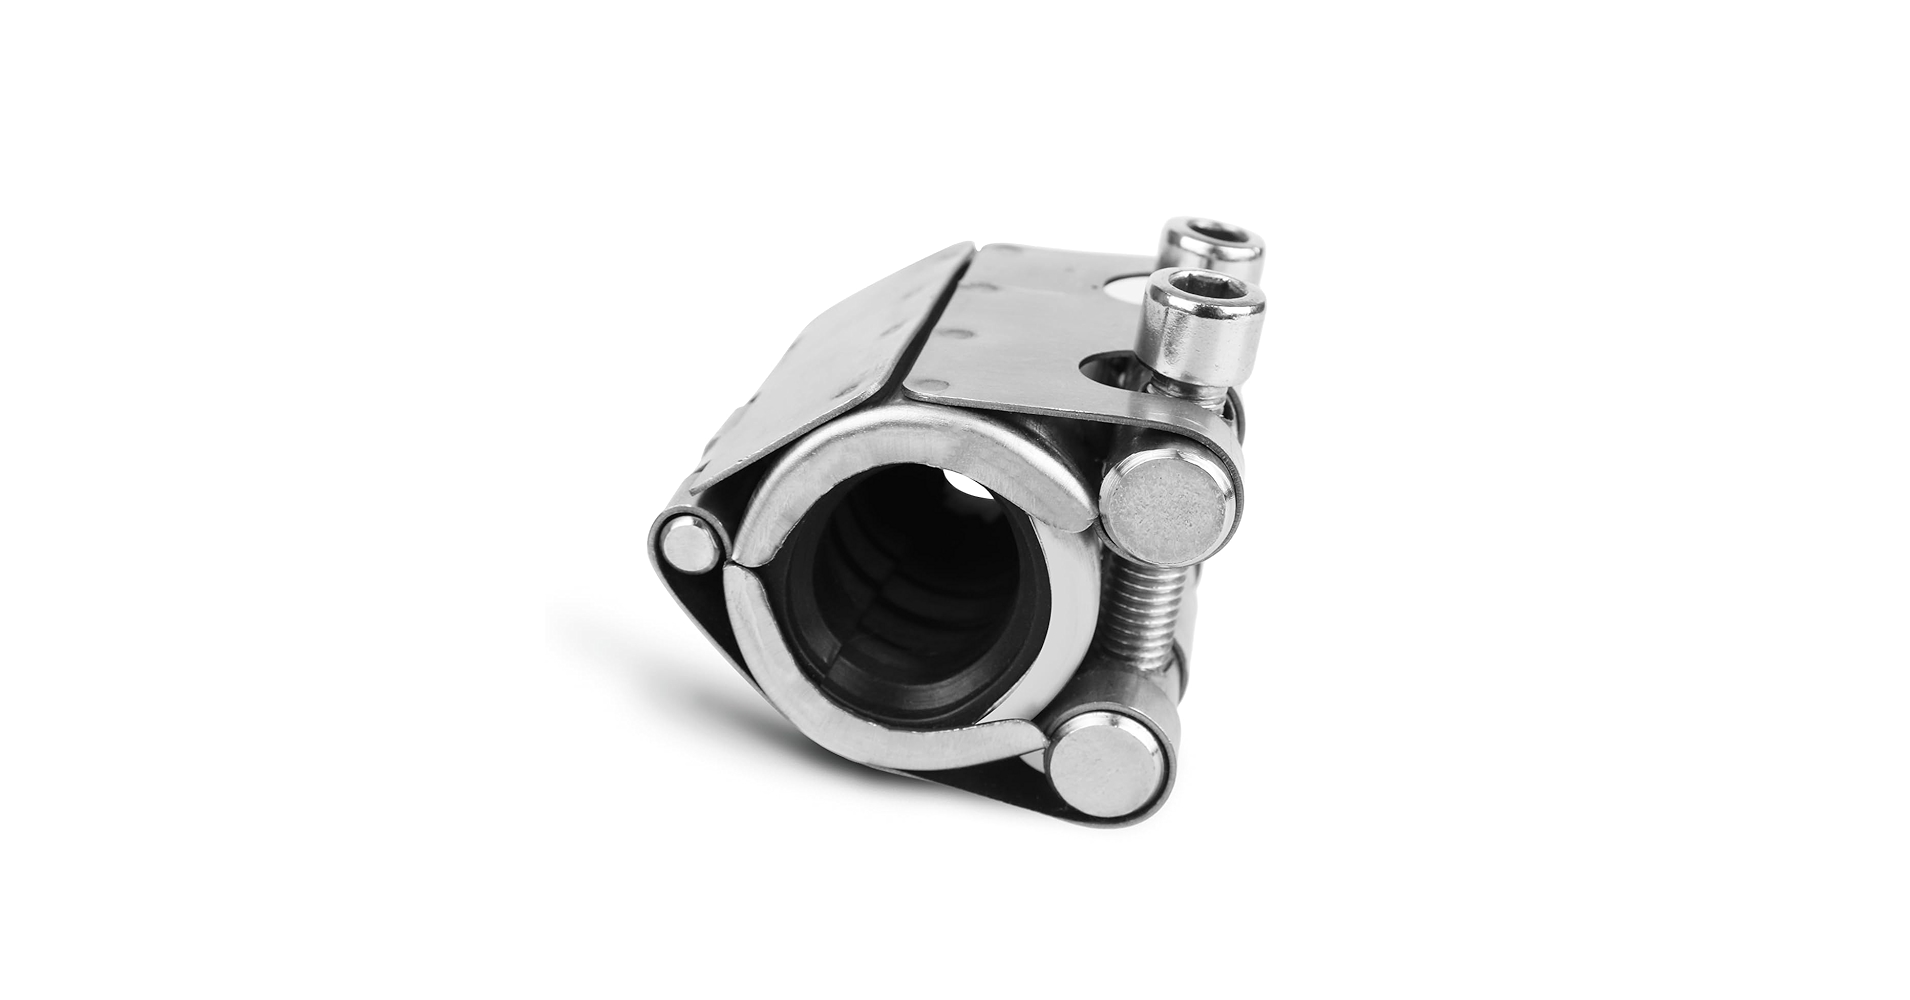
Meet your new best friends, clamps and couplings
Before you start turning wrenches, it helps to understand what these tools actually do. A repair clamp is a device that wraps around a damaged section of pipe with a piece of rubber or similar material on the inside. When you tighten it, that padding presses firmly against the leak point and seals it under pressure. The pipe stays in one piece, and the water has a much harder time finding its way out.
A coupling works in a slightly different way. Instead of squeezing a damaged area, it connects two clean pipe ends together. When a section of pipe is too cracked or crushed to trust, you cut that part out and bridge the gap with a coupling. Depending on the type, that connection can be threaded, pushed on, or tightened with nuts and bolts.
Both tools can be part of a long-term repair if they are chosen and installed correctly. In an emergency, though, think of them as a way to get control. A clamp is usually faster and feels more approachable for beginners, especially when the leak is still small. A coupling often takes a bit more confidence, since it involves cutting and measuring pipe, but it creates a very clean and stable connection when done right.
How to use a clamp when a pipe starts dripping
When you see water where it should not be, the first step is always the same. Find and close the main shutoff valve to stop the flow. This valve is often near the water meter, in a mechanical room, or where the main line enters the home. Turn it clockwise until it stops. Then open a nearby faucet for a moment to relieve pressure in the lines.
Once the water is off, you can look more closely at the leak. Dry the area gently so you can see what is happening. You might notice a fine crack, a tiny round hole, or a joint that is seeping around the edges. The goal is not to diagnose every detail. You simply want to find the exact spot where water was escaping.
Choose a clamp that fits the pipe size in front of you. Most will list the range of diameters they can handle. Before putting it on, clean the pipe with a rag. Remove dirt, loose paint, or scale so the rubber inside the clamp can sit flat. Place the rubber pad directly over the damaged area, then wrap the clamp body around the pipe and start tightening the bolts by hand.
Tighten gradually and evenly on both sides. Rushing this part can cause the clamp to twist and miss the leak point. Once it is snug, you can carefully turn the water back on, a little at a time. Watch the repaired area closely. If it stays dry, leave the clamp in place and keep an eye on it over the next few hours. Even if everything appears solid, it is still wise to schedule a proper inspection so a professional can confirm the overall condition of the line.
When a coupling gives you a better fix
Sometimes a clamp is not enough. If the pipe is split along a longer section or badly corroded, you may find that water leaks from several points at once. In that situation, the most reliable option is often to remove the damaged section and connect the remaining sound sections with a coupling.
This approach takes a bit more preparation. After shutting off the water and drying the area, measure the damaged length of the pipe. Mark out a section that removes all visible damage and leaves enough straight, clean pipe on each side for the coupling to grab. Use the correct cutting tool for the material, for example, a pipe cutter or saw rated for metal or plastic, and take your time to make smooth, square cuts.
Once the damaged piece is out, deburr or smooth the cut edges if needed. Then slide or push the coupling onto one side, position the replacement section of pipe, and bring the other side into place. Each style of coupling has its own tightening method, so read the instructions before you begin. The goal is an even, snug seal that holds pressure without distorting the pipe.
Because this method changes the layout of your plumbing, be honest with yourself about your comfort level. If you are not sure, it is better to use a temporary clamp to slow the leak and then call for help. A professional can always replace your temporary fix with a permanent one, and your early effort still reduces damage.
Build your own emergency leak kit
A small, well-prepared kit can turn a stressful leak into a manageable project. Start with a sturdy container that is easy to grab. Place it near a spot everyone in the household can reach without hunting through closets. Inside, keep a few common pipe sizes of repair clamps, a universal coupling or two for the most common lines in your home, and a short length of compatible pipe if space allows.
Add simple tools that support those repairs. An adjustable wrench, a small screwdriver set, a flashlight with spare batteries, and a marker for labeling pipes can make a big difference. Towels, absorbent cloths, and a lightweight bucket help you manage the water that has already escaped while you work on the source.
Finally, tape a clear instruction card to the inside lid. List the location of the main shutoff valve, a reminder to relieve pressure by opening a faucet, and phone numbers for trusted plumbers in your area. In a stressful moment, clear written steps are almost as valuable as the tools themselves.
Stay calm, act fast, and let the pros finish the job
Stopping a leak is really about buying time and limiting damage. Clamps and couplings give you a way to take control before the situation ruins floors, walls, furniture, and personal items. When you know where your shutoff valve is, have a simple kit ready, and understand the basic idea behind these tools, you can protect your home in those first critical minutes.
Once the immediate crisis is under control, the long-term solution still belongs with a qualified professional. They can check for hidden damage, test pressure, and confirm that your pipes are ready for everyday use again. Think of your new skills as a safety net. You may not need them often, but when water starts appearing where it should not, you will be very glad you took the time to learn.